Thursday, January 17, 2013

Jacques Pepin’s Pork Sausage Rolls with Potatoes, Onions & Tomatoes


One of the joys of having a recorder is to be able to record our favorite television series and watch them at our convenience. Jacques Pepin’s Essential Pepin is one of our favorites. The other night we watched him make a sausage dish and remembered fondly that Stuart, my brother-in-law, had made the very same dish recently and shared one of the sausage rolls with us. If it's possible, Stuart loves Jacques Pepin even more than we do.

Today I’m going to share some of the photos we took of the sausage rolls Stuart made instead of preparing the rolls myself because for the next several weeks I’m seeing a physical therapist who has put me on a very restricted schedule of what I can and cannot do right now in addition to therapy sessions that will last for possibly as long as a month. Neck pain has recently cropped up that stems from my chronic back pain and primarily I’m not too happy about it because I won’t be able to be out-and-about visiting your blogs as much as I would like. Pardon the pun, but it's a "pain in the neck" to have to be aware of how I'm holding my head all of the time. Of course my time allotted at the computer has also been drastically restricted and that of course will also affect the regularity of my posts. So if you don’t hear from me as much as usual for a while, you’ll know the reason and please don't forget me.


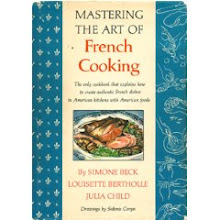
Jacques’ recipe is available on-line at his website Essential Pepin here and also in his book by the same name. This is an interesting recipe because instead of using casings to make the pork sausage, its wrapped in plastic wrap to create a log, then cured in the refrigerator for 2 days. In the cookbook he browned the sausage logs on top of the stove with onions and potatoes, which is how we cooked it. Meakin threw in some halves of cherry tomatoes for color as you can see in the photos. On the television series, Jacques showed an alternate method of cooking them which was to cook them in about 2 inches of water at 150 degrees on top of stove for one and 1/2 hours. Either way works very well.


The recipe called for black trumpet mushrooms, which Jacques finds in the woods around his house. If you don’t happen to have trumpet mushrooms in your woods, he suggests that you substitute dried porcini mushrooms, which are easier to find. When Stuart made his sausage rolls, he adapted the recipe by using a mixture of sliced shiitake, wood ear, porcini and oyster mushrooms and instead of pistachios, he substituted pine nuts. He also added a tablespoon of Italian seasonings.

This recipe makes two impressive sausage rolls that happen to also be very easy if you have the time to cure the sausage for 48 hours. When we prepared the dish, Meakin added the tomatoes to the potato and onion mixture when he cooked the sausages for fun as well as color and we served it with fresh spinach.

Thank you Stuart for helping me out and sharing Jacques fabulous sausage rolls you made for us.


This will be shared with Foodie Friday at Rattlebridge Farms, Miz Helen’s Country Kitchen Full Plate Thursday, Foodie Friday at Simple Recipes, Foodtastic Friday at Not Your Ordinary Recipes, Seasonal Sunday at the Tablescaper, and On the Menu Monday at Stone Gable.

Have a great weekend everyone. I hope to be back in full swing soon.

Thursday, January 10, 2013

Split Pea Soup Flavored with Ham and Rosemary + secrets to making a great soup


For some people, soup is reserved for fall and winter. Not us. We eat soup year-around and enjoy it no matter what the weather or the season. It’s been rather warm this week and a couple of days the high was in the low eighties. You would think it was April rather than January. This guy was sitting on the top of our car yesterday in Naples and sends his greeting from the Gulf coast of southwest Florida. Someone joked that maybe he was tired and wanted a catch a ride.


One of our all time favorite soups, and one of the easiest to make, is split pea soup. In fact I posted it a couple of years ago, link here. But today my split pea soup is a little different because I have a left-over ham bone from a baked ham that I want to use. Basically you just add the ham bone to the liquid of the split pea soup while it cooks. However, the ham bone will add more fat to the soup than I want, so I plan to skim to fat from the top of the soup. To do that I’m going to let the soup sit overnight in the refrigerator after it’s cooled from cooking and skim the fat from the top the next day. For a vegetarian soup, leave out the ham entirely and substitute vegetable broth for the beef broth called for in the list of ingredients.

Before we get to the recipe, I want to share a couple of secrets to making a rich and flavorful soup. The first is sautéing the vegetables until they lightly browned. My mother used to throw the vegetables in without browning them first. While there’s nothing wrong with that, and it does save some time, if you brown the vegetables first your soup will have a much richer flavor. Here’s what I do. I start sautéing the vegetables on high heat, then quickly switch to low, season with salt and pepper, and cook them slowly until they are nice and brown, taking care that they not burn.

The second secret is to add the herbs and a little bit of tomato paste to the vegetables at the end of the browning stage to let them flavor the vegetables at that stage. The tomato paste brings an incredible amount of flavor to the mixture and it’s nice for the herbs to sauté a minute or two to incorporate them with the vegetables.


Split Pea Soup Flavored with Ham and Rosemary
From My Carolina Kitchen and inspired from Cooking Light – serves 4 

12-oz package of green split peas
6 cups liquid (I use 4 cups of low sodium, low fat beef broth & 2 cups of water)
1 bay leaf
1 ham bone, trimmed of excess fat
1 tablespoon extra-virgin olive oil
1 onion, finely chopped
2 whole carrots, scraped & diced
2 small cloves of garlic, finely chopped
1 teaspoon dried thyme
2 teaspoons fresh rosemary, chopped
Kosher salt and freshly ground black pepper
1 teaspoon sweet Hungarian paprika
1 tablespoon tomato paste
1 tablespoon low-sodium soy sauce

Seasonings added before serving:
1 teaspoon extra-virgin olive oil
2 teaspoons chopped fresh rosemary
4 tablespoons chopped fresh flat-leaf parsley

Sour cream for garnish

Combine the peas, liquid, and ham bone in a large stockpot, cover, bring to a boil. When the mixture boils, turn to low and cook for 45 minutes to an hour, checking at 45 minutes for doneness.

In the meantime add the olive oil to a nonstick skillet over high heat. Start the vegetables off on high and quickly turn heat to very low, stirring very frequently. Sauté the vegetables until they are well softened and have taken on a slightly golden hue. Add thyme, rosemary, salt, pepper, and garlic and stir to cook for a moment. Add tomato paste, stir well, and cook a couple of minutes more to incorporate the tomato paste. Add soy sauce & cook until the liquid evaporates.

Add vegetables to the peas along with the bay leaf.  Peas should be done in about 45 minutes to an hour. Remove and discard bay leaf and the ham bone. Taste and season the soup with salt and pepper and add more liquid if necessary. Cover the soup and when it is cool, transfer to the refrigerator overnight.

The next day remove the layer of fat that has formed over the soup overnight and discard. At this point heat the soup up, then puree it with a  wand mixer (or use a blender) or puree half and leave the remaining half of the soup chunky. Serve right away, or cool and store in the refrigerator, covered, for 2 to 3 days.

Before serving soup, combine the last minute seasonings in a small bowl and stir into the soup. Spoon soup into serving bowls and top with about a tablespoon or so of sour cream.


Or not.


This will be shared with Foodie Friday at Rattlebridge Farms, Miz Helen’s Country Kitchen Full Plate Thursday, Foodie Friday at Simple Recipes, Foodtastic Friday at Not Your Ordinary Recipes, Seasonal Sunday at the Tablescaper, The Chicken Chick, and On the Menu Monday at Stone Gable.


Have a great weekend everyone.

Thursday, January 3, 2013

Quick Ham and Cheese Biscuits – a low fat version of fast food breakfast


These ham and cheese biscuits are perfect for days when you are in a hurry and don’t have time to make a sit-down breakfast. You could call them homemade fast food. They are a great “on the go” portable breakfast that can be held in one hand.

Kids as well as husbands love these ham and cheese biscuits. They’re perfect to eat in the car on the way to school or work. Or take a bag with you on an early morning fishing trip, which is where this boat looks like it’s headed as he motored past our lanai last week.


To make these biscuits light, the shortening (or butter in many recipes) was left out and the amount of low-fat milk was increased for moistness. Because the biscuits contain no shortening, they are lower in fat and calories than fast food joint biscuits. However, for that same reason, they don’t keep as well, so wrap them carefully if you are not going to eat them right away. I find that if you use extra-sharp Cheddar cheese, the biscuits will have more cheese flavor.

The biscuits come together in a matter of minutes. After mixing, simply drop them onto a baking pan (no rolling or cutting necessary), stick them in the oven, and in less than 25 minutes breakfast is ready. It is also a great way to use left-over ham.


Quick Ham and Cheese Biscuits – a low fat version of fast food breakfast
Adapted from Cooking Light – yield 1 dozen

Cooking spray
1 ½ cups chopped ham, about ½ pound, low fat preferable
2 cups all-purpose flour
1 cup (4 ounces) shredded extra-sharp Cheddar cheese
2 teaspoons baking powder
Dash or two of ground red pepper (cayenne), optional
1 cup 1% low-fat milk

Preheat the oven to 400 degrees F. Coat a 10” nonstick skillet with cooking spray and place over medium heat until hot. Add ham and sauté until lightly browned, about 3 - 4 minutes. Combine the ham, flour, cheese, baking powder, and red pepper in bowl. Add the milk, stirring just until dry ingredients are moistened.

Drop biscuit batter by heaping tablespoons onto a baking sheet coated with cooking spray. Bake in a preheated 400 degree F oven for 22 minutes. Yield 12 biscuits.


This will be shared with Foodie Friday at Rattlebridge Farms, Miz Helen’s Country Kitchen Full Plate Thursday, Foodie Friday at Simple Recipes, Foodtastic Friday at Not Your Ordinary Recipes, Seasonal Sunday at the Tablescaper, Chicken Chick, Carol's Chatter Food on Friday, and On the Menu Monday at Stone Gable.

Have a great weekend everyone.