Friday, February 24, 2012

Pizza - Made even better with Homemade Sauce and Dough


Pizza sauce and dough are two of the simplest things to prepare at home and both can be made in advance. The dough can be made in the food processor and stored in the refrigerator or freezer until you’re ready. The pizza sauce goes together in under 45 minutes and also freezes well. There’s just no excuse not to make your own.

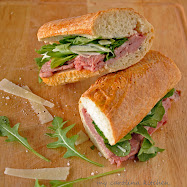
Oddly enough the best pizza I ever tasted was in a tiny restaurant in Salzburg, Austria many years ago. It was topped with sliced fresh tomatoes, which came as a surprise to me. I almost always use fresh tomatoes now. That particular pizza also omitted the traditional red tomato sauce, but I’ve used a little of a homemade sauce on my pizza today. Feel free to omit it. It’s delicious with or without the sauce.

For the dough I’ve used rapid-rise yeast. It’s a time saver because it is a strain of yeast that doesn’t need to be dissolved separately in liquid and the dough only needs to rest 10 minutes instead of the traditional one to two hours to rise.

Here are some tips from Wolfgang Puck for making pizza:

- Always bake in a hot, hot oven.
- Be sure to sprinkle your work surface with flour or cornmeal so your dough doesn’t stick.
- Brush dough with olive oil before adding toppings to avoid sogginess.


Quick-rising Pizza Dough in the Food Processor
Makes two 12” crusts
Printable Recipe

2 cups all purpose white flour
2 packages Rapid-Rise yeast
½ teaspoons salt
½ teaspoon sugar
1 tablespoon olive oil

In a large-capacity food processor, combine 1 cup flour, yeast, salt and sugar. Heat ¾ cup water and the oil to 125 to 130 degrees F. With the motor running, slowly pour in the hot liquid through the feed tube. Process, adding up to 1 tablespoons of cold water if needed to make the dough form a ball, then process for 1 minute to knead. Turn the dough out onto a lightly floured surface, knead about 9 to 10 times, then cover with plastic wrap and let rest 10 minutes.

Dough can be made ahead, punched down, dusted with flour and wrapped with plastic wrap and stored in a plastic bag in the refrigerator overnight. Bring to room temperature before using. Dough can also be frozen in plastic bags, defrosted overnight in the refrigerator, and then brought to room temperature before using.

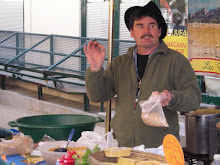
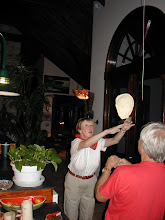
Tossing the dough in the air is one of the fun parts of making your own dough. Here I am learning how to toss the dough from a friend of ours at his house. You can probably tell by the look on my face that I was a little afraid of dropping it. It always helps to have someone cheer you on and encourage you when trying something new.


Basic Pizza Sauce
Yield 4 cups, enough for four 12” pizzas
Printable Recipe

2 tablespoons olive oil
1 cup finely chopped yellow onions
2 cloves of garlic, finely chopped
2 - 28oz cans Italian peeled tomatoes, drained and crushed (save liquid)
4 tablespoons tomato paste
3 tablespoons freshly squeezed lemon juice
1 teaspoon dried oregano
1 teaspoon dried basil
Pinch of ground allspice
Kosher salt and freshly ground black pepper to taste
Pinch of hot pepper flakes
2 tablespoons chopped flat-leaf parsley
Splash of red wine if desired

Heat the olive oil in a medium-sized saucepan. Add the onions and cook over low heat to wilt. Add the garlic and cook a minute or two longer, taking care not to let the garlic burn. Add remaining ingredients (except parsley) including the liquid from the tomatoes. Stir well, cover and simmer over low heat for 15 minutes, stirring once or twice. Remove the lid, add the chopped parsley and wine if using, then simmer an additional 15 minutes or until the sauce is fairly thick, stirring occasionally. Remove from the heat, cool, and refrigerate (or freeze).


Fresh Tomato and Basil Pizza
Serves 3 to 4
Printable Recipe

Dough for a 12” pizza, brought to room temperature if it has been refrigerated
Corn meal for preparing baking sheet or pizza stone
2 teaspoons olive oil
½ to ¾ cup pizza sauce (optional)
½ cup grated fresh imported Parmesan cheese (not the stuff in the green can), divided
2 – 3 tomatoes, cut into ¼” slices
6 cloves of garlic, thinly sliced
Kosher salt and freshly ground black pepper
Fresh basil leaves for garnish and a wonderful fresh flavor

Preheat the oven to 500 degrees F. Prepare a baking sheet or pizza stone by sprinkling with a little cornmeal. Roll out pizza dough to the desired shape and place on baking sheet or stone. Brush with the olive oil. Spread with pizza sauce if using, leaving a ½ inch border, then sprinkle with half of the Parmesan cheese. Arrange the tomatoes over the cheese and top with garlic, salt and pepper and remaining cheese.

Bake the pizza at 500 degrees F for 12 minutes. Check to see if pizza is crispy. If not, let it cook another minute or two. When done, remove to a cutting board and sprinkle with some torn basil leaves. Let sit for 5 minutes before slicing.

Not all pizzas have to be round - create your own shape

Did I hear someone say where’s the mozzarella cheese? Your wish is my command. One of my favorite pizzas is the classic Pizza Margherita, shown above, made with mozzarella, fresh tomatoes and basil. As the story goes Queen Margherita was visiting Naples in 1889 and grew tired of fancy French fare and wanted to try what the common people ate. The owner of the best pizzeria in all of Naples was summoned to prepare three pizzas for her Highness. His mozzarella version was her favorite so he named it Pizza Margherita in her honor. While many people believe this story, records indicate that pizza with mozzarella, tomatoes and basil, which happen to be the same colors of the Italian flag, was eaten in Naples forty years before she sampled it.  You can find my recipe for Pizza Margherita here in an earlier post.


I hope everyone has a great weekend. Last Saturday this pretty hot air balloon floated past our lanai as we were having breakfast. Meakin was able to get a good shot of it through the screen don’t you think.

*  *  *

This will be linked to Miz Helen’s Country Kitchen Full Plate Thursday and Foodie Friday at Designs by Gollum.

Sunday, February 19, 2012

Join me for Sunday Supper at Providence Ltd. featuring southern Pickled Shrimp


I am so excited that I’ve been asked to do a guest post for Providence Ltd. Interior Design’s Sunday Supper series. I’ve prepared a southern appetizer that’s popular in shrimp country – Southern Pickled Shrimp for Providence Ltd’s Sunday Supper that I know you’ll enjoy. Click here. Or printable recipe here.

Mona and “Sister” (real name Talena, but she’s affectionally referred to as “Sister”) are a sister team in their design firm. I’ve been following their blog Providence Ltd. for quite a while now and I can attest to their skills and very classy taste. Meakin and I counted the other day that during our marriage we’ve remodeled eleven houses and built two. Remodeling is one of our passions and we even thought of going into the business until the oil industry in Texas had one of its many crashes early in our marriage. How I wish we had known designers such as Mona and Sister during these projects. They certainly would have helped guarantee our success.


Just because we all love food on My Carolina Kitchen and that’s what we talk about, it doesn’t mean we don’t care about how our kitchens function or how our dining rooms are designed. Of course we care – there’s more to life than just food, right? Right.

Here’s a beautiful example of one of Mona & Sister’s design projects featured in At Home in Arkansas. Just look at all of the lovely stone and brick and beamed ceilings in this kitchen. My mind is whirling thinking of what delicious dishes that I could whip up here. Have a seat on one of the stools and we’ll talk recipes.

Providence Ltd. Design
This is the formal dining room in the same home. I am crazy about lanterns and this iron chandelier that the sisters found and had re-wired is a beautiful example. Mirrors have found their way into my decorating scheme too lately. Imagine the wonderful dinner parties that must take place in this lovely dining room.

Providence Ltd. Design
One of my very favorite things to add to a house or create when the space is available is a butler’s pantry. Actually we have a small butler’s pantry in both of our current homes. It’s a wonderful place to store your good china, crystal, and silver, or to use as a bar area to get the drink-making out of the kitchen. This lovely example is also one of the features in the house above.

Providence Ltd. Design
Now, let’s eat. Please join me at Sunday Supper at Providence Ltd. Click here. While you’re there, grab a pickled shrimp or two before they’re all gone and cruise around their blog and enjoy these talented ladies’ fabulous design portfolio. See you there.


* * *

This will be linked to Miz Helen’s Country Kitchen’s Full Plate Thursday and Foodie Friday at Designs by Gollum.

Monday, February 13, 2012

Crème Brulee – an amazingly elegant French dessert


Crème brulee is one of the most amazingly elegant French desserts ever created. It’s also a real crowd pleaser, especially with the men. Crème brulee (pronounced "krem broo-LAY") means “burnt cream” in French and the caramelized sugar on top of the custard characterizes the dish.

Surprisingly it’s very easy to make. Crème brulee is basically custard with nothing but eggs, cream and sugar, plus a little vanilla for flavor. All you need is time to let it rest overnight in the refrigerator and have a little patience between the steps and you’ve got it made.


It’s even easier to make if you solicit the help of your husband, which I’ve done in this case. It’s one of Meakin’s specialties and he enjoys playing around with the seasonings. You can add flavors such as Grand Marnier, lavender, citrus, or in our case star anise and cinnamon. Don’t be afraid of the flavorings. They are very subtle. You could also make your own vanilla sugar for the sugar on the top. Meakin lightened it up a bit and zapped away a few of the calories by substituting half and half for some of the cream. He follows the basic recipe from Ina Garten, The Barefoot Contessa, and goes from there. Here is an excellent tutorial on how to caramelize the top of the crème brulee that I found very helpful. We try to eat healthy, so we only prepare this when we're having guests. After all, we need someone to help us eat the six servings.

Often we’ve let our dinner guests brulee their own with the torch, but I offer this suggestion with a warning. Make sure they haven’t had too many martinis or glasses of wine, otherwise you might be asking for a kitchen disaster.

As the Barefoot Contessa likes to say, “Your guests may not recall what you served for dinner, but they will always remember the dessert.” And crème brulee is one of the most memorable desserts of all.


Crème Brulee
Adapted from The Barefoot Contessa Barefoot in Paris – serves 5 to 6

1 extra-large egg
4 extra-large egg yolks
½ cup sugar, plus 1 tablespoon for each serving
1 cup heavy cream
2 cups half and half
5 star anise
1 cinnamon stick
1 teaspoon pure vanilla extract, not the imitation kind
1 tablespoon orange liqueur, such as Grand Marnier

In the bowl of an electric mixer fitted with a paddle attachment (or you can use a handheld mixer), mix the egg, egg yolks, and ½ cup of the sugar together on low speed until just combined. Meanwhile add the star anise and cinnamon into the cream, then scald the cream and half and half in a small saucepan until it’s very hot to the touch but not boiled. Remove the star anise and cinnamon and set aside. With the mixer on low speed, slowly add the hot cream to the eggs. Add the vanilla and orange liqueur.

When the cream has cooled, add the star anise and cinnamon stick again, then place the cream in a bowl and lay plastic wrap over the very top of the cream to prevent a skin forming. Refrigerate overnight for the flavors to meld.

The following day preheat the oven to 300 degrees F. Remove the cream from the refrigerator, then remove the star anise and cinnamon stick and discard. Pour the cream into 6 to 8 ounce ramekins until almost full.

Place the ramekins in a baking pan and carefully pour boiling water into the pan to come halfway up the sides of the ramekins. Bake for 35 to 40 minutes, until the custards are set around the edges and wiggly in the center when gently shaken. Remove the custards from the water bath, cool to room temperature. and refrigerate until firm.

To serve, spread a tablespoon of sugar evenly on the top of each ramekin and heat with a kitchen blowtorch until the sugar caramelizes evenly. Allow to sit at room temperature for a minute until the sugar caramelizes and hardens.


Sanibel Beach

It’s been quite cool in south Florida the last day or so. This morning the local weather report said it was a breezy 39 degrees. The temperature is always a bit warmer on the water and it was 44 on our lanai when we got up this morning. A little known fact about Sanibel and Captiva Island (knows as “the islands” in Fort Myers): Anne Morrow Lindbergh, wife of the famous aviator, wrote her best-selling love letter, A Gift From the Sea, without ever identifying it as Captiva Island.

When we lived in the Bahamas, if there was a cold front in the forecast, our friend Silbert always started his weather report for the Cruiser’s Net with, “Tonight you’ll need a side blanket as our forecast calls for a cold front to approach our area late today.” A side blanket, for those of you who don’t know and we didn’t either the first time we heard it, is a person to snuggle to in the bed on a cold night. So much more romantic for Valentine’s Day than an electric blanket don’t you think?


Happy Valentine’s Day from Meakin & Sam. The orchid is a valentine to me from my very special valentine.

* * *

This recipe will be linked to Miz Helen’s Country Kitchen Full Plate ThursdayFoodie Friday at Designs by Gollum & Healthy Mommy Healthy Baby Sweet Saturday.

Thursday, February 9, 2012

The Dock at Crayton Cove - a Tropical Taste of old Naples Florida


The Dock at Crayton Cove is a seafood restaurant located on the Fishing Pier in Naples, Florida that advertises a laid-back attitude with bay views and great food. They like to think of themselves as a little piece of Naples’ history. They’ve been there for more than 30 years, and for a lot of locals and visitors too, they’re practically part of the family.


For us that is really true. A trip to Naples always includes lunch at the Dock. We’ve been dining at the Dock in Naples since the seventies when Meakin’s mother retired to nearby Marco Island.


A little history of the area - The Naples Fishing Pier was originally built as a freight and passenger dock in 1888. In the 1920’s the area was known as “The Back Bay” because it provided the town’s first sheltered moorage. It became the community center for the year-around pioneers who were building the Tamiami Trail, creating a fishing industry, and laying the foundation for Naples. Renamed “Crayton Cove” in 1936, it remains an integral part of  Naples’ social and business life while providing a rare glimpse into the town’s earliest days.

The Dock is an open-air restaurant overlooking Naples Bay. You can come by car or boat.


Seafood has been a three-decade love affair at the restaurant where, according to their menu, they offer "seasonally superior fin-fish, shellfish and crustaceans energized with tropical flavors. The preparation reflects the area’s cultural history of the Caribbean and Latin cuisines." In our opinion, it's some of the best seafood in southwest Florida.

On our most recent visit I had the porcupine grouper with mango Thai chili sauce and pineapple salsa that was not only crispy and delicious, but also very colorful as you can see.


Meakin can never resist calamari, so he chose the flash fried calamari “Ropa Vieja” with a spicy red sauce and a drizzle of secret sauce. His favorite way to start his meal is with a wonderful bowl with steaming clam chowder. The Dock's chowder was chock full of clams and had a very nice consistency, not too much of a flourly taste as some inferior chowders are inclined to have.


Meakin’s mother’s favorite item was always the Dock hotdog, a foot long affair with all of the trimmings. I can still hear her saying, “Tell 'em to burn it.” Many times since her death we’ve ordered the hotdog in her memory, which is no longer on the menu. You almost have to be a local to know about it. Last time I ordered the hotdog, an older gentleman at a table near us (who was very snappy dresser in his starched shirt and bow tie) nodded and winked as his sign of approval when he saw the waitress serve my hotdog.


We recommended The Dock to our friend Larry of Big Dude’s Eclectic Ramblings when he was in the area last fall. He ordered the seafood tower which included 6 raw oysters and clams, 12 steamed mussels, 6 boiled shrimp and half a snow crab, plus 3 sauces and lots of napkins. To quote Larry, “I enjoyed every bite and while it looked like a lot to eat, about 75 percent of it was still on the tower when I finished and I was pleasantly full. The waitress said she’d served several sea food towers as a table-wide appetizer, but never to a person as a meal. She can count on her second time when I come down next year.”

We never leave Napes without a stroll down the glamorous and ritzy shops on Fifth Avenue South, one of the nation’s premier shopping districts. One of my favorite stops is Cleopatra’s Barge.

This fine jewelry shop has been in business for 44 years and owner & designer Marilyn Janss is one talented lady. She was trained by two premier jewelers, one of whom designed and manufactured jewelry for Cartier, Tiffany & Co., and Van Cleef & Arpel. I have an “I Love You” gold charm that was designed by Marilyn for Meakin’s mother as a gift from her husband and every time I wear it I can count on getting compliments.


Among the many other unique creations at Cleopatra's Barge, Marilyn has designed a lovely Naples Medallion in 14k yellow gold or sterling silver to celebrate the Naples Fishing Pier, where we just dined. Don’t leave Naples without a stop at Cleopatra's Barge.


Cheers and good-bye from Naples, Florida and The Dock at Crayton Cove where locals and visitors alike have been enjoying consistently excellent seafood, tasty salads and sandwiches, tempting beef, poultry and pasta dishes in a casual, laid back setting for over 30 years. In a town full of jewelry stores catering to the wealthy and elite, Cleopatra's Barge is the insider's favorite (sorry Tiffany).

The opinions in this post are solely my own and I was not compensated in any way. I will be linking this to Miz Helen’s Country Cottage Full Plate Thursday and Foodie Friday at Designs by Gollum.

Thursday, February 2, 2012

Lemon Arugula Salad with Roasted Carrots and Parmesan Cheese


This simple lemon arugula salad with roasted carrots and Parmesan cheese is perfect for a simple, healthy lunch on a lazy day when all you feel like doing is propping your feet up and taking it easy. The carrots practically roast themselves in the oven and it doesn’t take but eight to ten minutes toss the croutons with a bit of olive oil until they are nicely browned. All that remains is assembly and you’re "good-to-go" as they say.

The original recipe called for parsley leaves, but frankly I thought they would be too strong for my taste, so I substituted peppery arugula. But I urge you to try the parsley for a change of pace. I toasted the croutons on top of the stove instead of baking them in the oven. After I discovered The Barefoot Contessa Ina Garten’s recipe for tossing the bread cubes in a pan on top of the stove, I swore I would never ever go back to the oven method again.

The peppery arugula goes quite well with the lemon vinaigrette and the Parmesan cheese gives the salad a nice salty bite. Roasting the carrots until they are slightly charred really brings out their sweetness. This salad also makes a nice vegetarian lunch. Enjoy!


Lemon Arugula Salad with Roasted Carrots and Parmesan Cheese
Adapted from Martha Stewart Living – serves 6

1 pound of carrots, peeled, halved lengthwise, and cut into 3” pieces
6 tablespoons extra virgin olive oil, plus more if necessary for croutons
Kosher salt and freshly ground black pepper
2 cups sturdy bread, such as a country loaf, cut into 1” cubes
4 cups fresh arugula, also called rocket
¼ to 1/3 cup grated imported Parmesan cheese, plus more for shavings
1 tablespoon plus 1 teaspoon freshly squeezed lemon juice
French fleur de sel or coarse sea salt for finishing

Preheat the oven to 375 degrees F. In a large bowl, toss the prepared carrots with 2 tablespoons olive oil and season with salt and pepper. Lay carrots on a baking sheet in one layer and bake until slightly charred, turning once, about 50 minutes.

While the carrots are baking, heat a large non-stick sauté pan with 2 tablespoons of olive oil until very hot. Lower the heat to medium low and add the bread cubes and season with a little salt. Sauté the bread cubes, tossing frequently, until nicely browned, about 8 to 10 minutes. Add more olive oil if needed.  When the cubes are browned, remove to a plate and set aside until time to toss the salad.

To assemble the salad, toss the arugula, roasted carrots, lemon juice, 2 tablespoons extra-virgin olive oil and grated Parmesan in a large salad bowl. Add croutons and season the salad with the fleur de sel or coarse sea salt and freshly ground black pepper and toss again. Plate the individual salads and, with a vegetable peeler, shave some extra Parmesan cheese over each serving. Serve immediately.

A nice chilled glass of Chardonnay would go very well with this salad. This recipe is being linked to Miz Helen’s Country Cottage Full Plate Thursday and Foodie Friday at Designs by Gollum.

We're going to one of the local farmer's markets on Saturday where we've heard they have freshly caught Gulf of Mexico seafood. Later that day we plan to do a little antiquing. Then of course we don't want to miss the Superbowl on Sunday. What are your plans for the weekend?